 luckpanda
PO Approval Workflow: How to Set One Up in 7 Steps
A PO approval workflow routes every purchase order to the right approver by amount before it reaches the vendor. Set one up in 7 steps, with thresholds.
On this page
- What do you need before setting up a PO approval workflow?
- What are the steps in a purchase order approval process?
- Step 1. Decide what needs approval at all
- Step 2. Set amount thresholds (tiers)
- Step 3. Add category rules where amount is not enough
- Step 4. Name an approver and a backup for each tier
- Step 5. Separate the requester from the approver
- Step 6. Set a time limit and an escalation rule
- Step 7. Issue the PO and keep the record
- Who should sign off at each tier?
- How long should PO approval take?
- Common mistakes and how to fix them
- Tools for running a PO approval workflow
TL;DR: A PO approval workflow decides who must sign off on a purchase order, based on its amount and category, before the order goes to the vendor. For a small business, three amount tiers, one named backup per approver and a rule that nobody approves their own request cover most of the risk. Write the rules down first, then put them in whatever tool you use.
A PO approval workflow (also called a purchase order approval process) is the set of rules that routes a purchase order to the right person for sign-off before it is sent to a supplier. A working version for a small business has seven parts: a written request, amount tiers, a named approver for each tier, a backup for each approver, a rule that the requester never approves their own order, a time limit for each decision, and a record of who approved what and when. The purchase order only becomes a commitment once it is approved and sent, so the approval is the last cheap moment to stop a wrong purchase.
What do you need before setting up a PO approval workflow?
You need four things before the first step works:
- A purchase request or requisition. Someone has to ask in writing: item, quantity, estimated price, vendor and why. The purchase requisition guide covers the form and when it is worth having.
- A list of who can spend money. Names, not job titles. In a five-person business this is often the owner, one manager and the person who places orders.
- Your monthly spend picture. Look at the last 90 days of purchases. You need the typical order size to set tiers that catch the big ones without slowing the small ones.
- A purchase order document with a number. A PO without a unique number cannot be matched later to the goods receipt and the bill. If you have none, start with a free purchase order format.
What are the steps in a purchase order approval process?
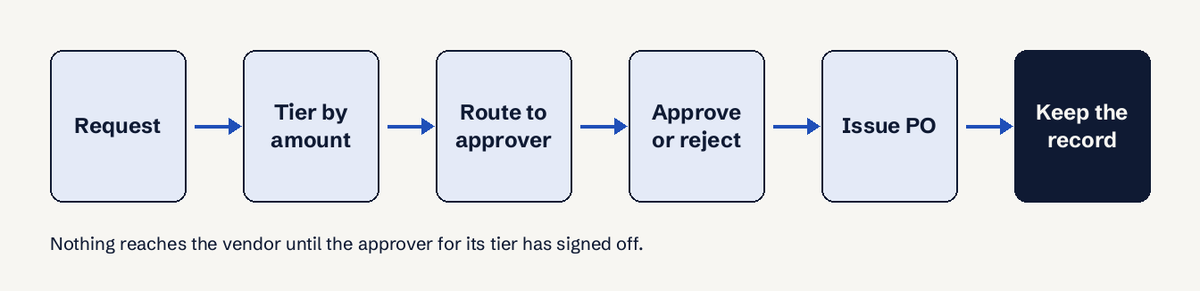
The steps in a purchase order approval process are: (1) an employee raises a purchase request, (2) the request is checked against budget and the approved vendor list, (3) it is routed to the approver for its amount tier and category, (4) the approver approves, rejects or sends it back with a question, (5) the approved request becomes a numbered purchase order sent to the vendor, and (6) the PO is later matched with the goods received note and the vendor's bill before payment. Steps 1 to 5 are the approval workflow; step 6 is the invoice approval process on the accounts payable side. Here is how to set each part up.
Step 1. Decide what needs approval at all
Not every purchase needs a sign-off. Write one sentence that defines the scope, for example: "Every purchase order, and any purchase without a PO above ₹10,000." Small recurring buys (tea, stationery) go through petty cash or a company card with a limit of, say, ₹5,000 per month instead. Approving everything trains approvers to click without reading.
Step 2. Set amount thresholds (tiers)
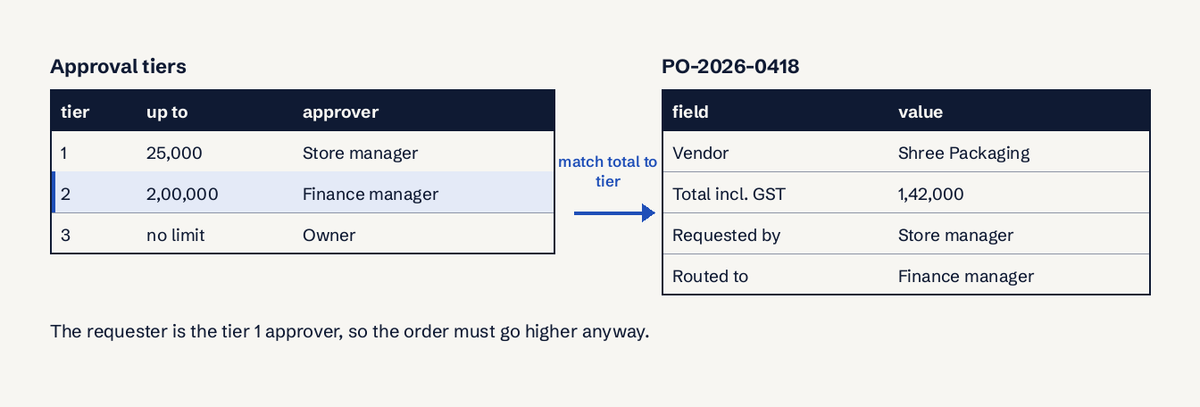
Amount-based tiers are the core of every PO approval process. Three tiers are enough for most businesses with under 50 people (about 1 approver per 10 staff):
| Tier | Order value (example, India) | Order value (example, US) | Approver |
|---|---|---|---|
| 1 | Up to ₹25,000 | Up to $500 | Department lead or store manager |
| 2 | ₹25,001 to ₹2,00,000 | $501 to $5,000 | Operations or finance manager |
| 3 | Above ₹2,00,000 | Above $5,000 | Owner or director |
These numbers are examples, not a standard. Set yours so that tier 1 covers roughly 70% to 80% of orders by count and tier 3 covers the handful of orders that would hurt if they were wrong. Compare the total order value including tax, not one line, and decide whether a blanket order is judged on its total commitment (it should be).
Step 3. Add category rules where amount is not enough
Some purchases need a second look whatever the amount:
- Capital items (machines, laptops, vehicles): always tier 3, because they hit the balance sheet and often a loan or budget.
- New vendors: a vendor that has never been paid needs its bank details and tax ID checked before the first order is approved.
- Software subscriptions: they renew on their own, so approve the annual cost, not the monthly one.
- Anything outside the budget line: route to whoever owns the budget.
Step 4. Name an approver and a backup for each tier
Use names. "Finance" is not an approver; "Priya, backup Arjun" is. Microsoft Dynamics 365 Business Central works the same way: each user gets an Approver ID, a Purchase Amount Approval Limit in local currency, or Unlimited Purchase Approval, and a Substitute who approves when the approver is away (Microsoft Learn, Set up approval users). Business Central falls back from the substitute to the direct approver and then to the approval administrator. Copy that idea even on paper: every approver needs a named backup, and the owner is the final fallback.
Step 5. Separate the requester from the approver
The person who asks for a purchase must never approve it. This is segregation of duties, and it is the control auditors check first. Business Central's own documentation warns that when the same user is both requester and approver in a workflow user group, their requests are approved automatically (Microsoft Learn). In a three-person business you cannot separate every duty, so separate the two that matter most:
- whoever raises the PO does not approve it, and
- whoever approves the PO does not pay the bill alone.
When the owner raises an order, a second person reviews it after the fact, every 30 days, from the list of orders.
Step 6. Set a time limit and an escalation rule
A request that waits 7 days gets bypassed: people order by phone and raise the PO later. Set a decision deadline per tier, for example 1 day for tier 1 and 2 days for tiers 2 and 3. When it passes, the request goes to the backup. If the approver is on leave, the backup decides from day one; there is no reason to wait for the deadline.
Step 7. Issue the PO and keep the record
Only an approved request becomes a numbered purchase order sent to the vendor. Record four things for each decision: who approved or rejected, when, at which amount, and the reason for a rejection. If the order changes after approval (higher quantity, new price), it goes back for approval. Business Central handles this by moving the document from Pending Approval back to Open when the request is cancelled, and locking it while approval is pending (Microsoft Learn, Use approval workflows).
Who should sign off at each tier?
Who should approve a purchase order? The person who owns the budget the money comes from, as long as they did not request it. In practice:
- Tier 1: the department lead or store manager, because they know whether the item is needed.
- Tier 2: the finance or operations manager, because they know whether the cash is there this month.
- Tier 3 and capital items: the owner or a director, because these commit the business.
- New vendors: whoever maintains vendor records checks the bank details and tax ID before the first order.
Two approvers in sequence (manager, then owner) make sense only for tier 3. Adding a second signature to every order doubles the waiting and rarely catches more.
How long should PO approval take?
PO approval should take 1 day for routine orders and no more than 2 days for large ones. If approvals regularly take longer, the usual causes are too many tiers, approvers who only check email weekly, and missing information in the request (no quote attached, no reason given). Fix the request form before adding more rules. Watch one number every 30 days: the share of orders placed before their PO was approved. Anything above 5% means the workflow is being worked around.
Late approvals also cost money on the payment side. In India, buyers must pay registered micro and small enterprise suppliers within the agreed period and never later than 45 days from acceptance of the goods (MSMED Act 2006, section 15). An order stuck in approval does not stop that clock once the goods arrive.
Common mistakes and how to fix them
- Approving after the goods arrive. Symptom: POs dated after the delivery note. Fix: the store refuses deliveries without a PO number.
- Splitting orders to stay under a tier. Symptom: two orders to the same vendor on the same day, each just under the limit. Fix: review orders by vendor and date each month; judge related orders on their combined value.
- Approvers with no backup. Symptom: orders pile up during holidays. Fix: Step 4, named backup for every approver.
- Edited orders that keep their old approval. Symptom: the PO total differs from the approved amount. Fix: any change to quantity, price or vendor sends the order back for approval.
- Approval by chat message. Symptom: "OK go ahead" on a phone, nothing on the PO. Fix: the approval is recorded where the PO lives, with the name and date.
Tools for running a PO approval workflow
Spreadsheets and email work up to roughly 30 orders per month, as long as the PO number, approver and date sit in one sheet. Past that, the options are:
- ERP and accounting suites such as Microsoft Dynamics 365 Business Central, which ship ready-made approval workflows for purchase documents with amount limits and substitutes.
- Dedicated approval tools that connect to your accounting software and add approval chains on top.
- Purchasing modules in a business system, where the PO, the goods receipt and the bill are the same record, so the approval stays attached to the order.
If you already make purchase orders in LuckPanda Purchasing, orders are numbered in their own PO series per financial year, and converting an order into a bill refuses to bill more than was ordered. Approval rules by document and amount are being built in Workspace and are not live yet, so today the tiers above are a written policy you apply before you issue.
Questions
What is a PO approval workflow?
A PO approval workflow is the set of rules that sends each purchase order to the right person for sign-off before it goes to a vendor. It usually routes by order value and category, names a backup approver, and records who approved what and when.
How do you set PO approval thresholds?
Look at 90 days of orders, then set tier 1 so it covers most small orders by count, and tier 3 so it catches the few orders that would hurt if wrong. Compare the total including tax, judge blanket orders on their full commitment, and review the tiers every 12 months.
Can the person who raises a PO also approve it?
No. The requester should never approve their own order. In very small teams, the owner's own orders get a monthly after-the-fact review by a second person instead.
What is the difference between a purchase requisition and a purchase order?
A purchase requisition is an internal request to buy something; it commits nothing. A purchase order is the document sent to the vendor after approval, and it commits the business to the price and quantity on it.
What happens if a PO is changed after approval?
It should go back for approval. A change to quantity, price or vendor means the approved amount no longer matches the order, which is exactly what the approval was meant to control.
Do small businesses need a PO approval process?
Yes, once more than one person can place orders. Even a single rule, "orders above a set amount need the owner's sign-off, recorded on the PO", prevents most unplanned spending and makes the bill easy to check later against the accounts payable process.